V1.1
Overview
Extraction in Accounts Payable system is challenging for several reasons. Documents come in different formats and data can be complex. Poor quality scanned documents cause extraction tools to misread characters or overlook key data points, requiring extensive manual corrections. Also, unstructured data like additional notes and terms can be misinterpret by basic extraction systems.
The Eyeball functionality in Genpact AP Capture offers enhanced reviewing and correction of errors in the data before passing it to the Accounts Payable system for processing.
By default, the system follows the eyeballing step. However, if you need to execute eyeballing based on fulfilment of some condition then you can configure the rules in different yaml files.
Prerequisite
Make sure you have an eyeball configuration yaml file defined in the ConfigSet.
The predefined configuration in yaml files define different review criteria for eyeball, such as fields that will be displayed in the eyeball for review, the mandatory fields, the type of value list for fields’ selection, the characters supported in field values, extraction confidence level, and more.
How Eyeball works
To review the document data with eyeball, follow the steps below:
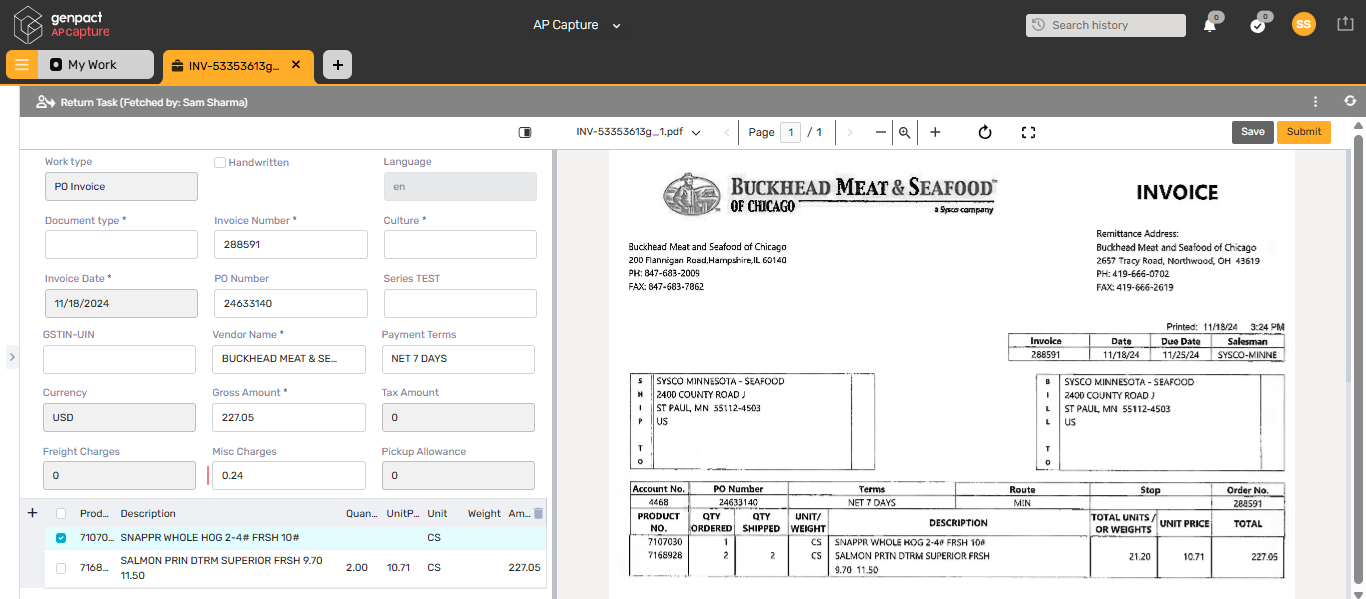
- In the portal, navigate to the list of tasks, and then fetch the task you want to eyeball. The task details page displays the extracted data in the eyeball screen and the original document side by side. The eyeball screen is in the left side and the original scanned document in the right side.
- In the eyeball screen, click a field to view the corresponding value in the scanned invoice.
- Review and edit the field value, if required.
- Click on an empty field to fill in a missing value.
- Click and drag the mouse in the original document to capture the value and populate it in the empty field.
- Click Save, to save the data.
- Click Submit, to submit the task for processing.

Eyeball screen
- The eyeball screen appears in the left side of the split screen with header data from the original document displayed in fields at the top and the line items displayed in rows and columns format at the bottom.
- If the original document orientation is not vertical, then the system auto rotates it to vertical orientation. However, you can change the page orientation in a document manually with the rotate icon that rotates the page, by 90 degrees on each click, to an extent of 360 degrees.
- The fields populated with the extraction data appear with thin borders and turn blue when you click in the field to edit.
- The fields auto populated with the enrichment data appear shaded with thick borders.
- With the polygon functionality, you can select the data from the document to populate a field in the eyeball screen. The polygon identifies the data from the pages in different orientations also.
- Fields, with a Red vertical bar, have been configured for confidence percentage in the eyeballing-decision.yaml file.

- You can expand and shrink the screen size with the zoom in (+) and zoom out (-) icons.
- You can validate the document by validate option.
- If a document has more than one pages, then you can move to any page by mentioning the page number in the Page number field.
- Use the Toggle Fullscreen icon to view the eyeball screen in full screen.
- Use the Screen Alignment icon to change the split view of the eyeball screen and document in vertical or horizontal.
- You can use the tab key to jump between the fields in the eyeball screen.
- You can filter the data in the line-items table fields.

Eyeball configuration
You can configure eyeball properties with a yaml config file to be defined in the ConfigSet.
For details, see this article.
V1.0
Overview
Extraction in Accounts Payable system is challenging for several reasons. Documents come in different formats and data can be complex. Poor quality scanned documents cause extraction tools to misread characters or overlook key data points, requiring extensive manual corrections. Also, unstructured data like additional notes and terms can be misinterpret by basic extraction systems.
The Eyeball functionality in Genpact AP Capture offers enhanced reviewing and correction of errors in the data before passing it to the Accounts Payable system for processing.
By default, the eyeballing decision is set to true, so the system follows the eyeballing step by default. However, if you need to execute eyeballing based on fulfilment of some condition then you can define in the yaml the rules for false decision.
Prerequisite
Make sure you have an eyeball configuration yaml file defined in the ConfigSet.
The predefined configuration in yaml files define different review criteria for eyeball, such as fields that will be displayed in the eyeball for review, the mandatory fields, the type of value list for fields’ selection, the characters supported in field values, extraction confidence level, and more.
How Eyeball works
To review the document data with eyeball, follow the steps below:
- In the portal, navigate to the list of tasks, and then fetch the task you want to eyeball. The task details page displays the extracted data in the eyeball screen and the original document side by side. The eyeball screen is in the left side and the original scanned document in the right side.

- In the eyeball screen, click a field to view the corresponding value in the scanned invoice.
- Review and edit the field value, if required.
- Click on an empty field to fill in a missing value.
- Click and drag the mouse in the original document to capture the value and populate it in the empty field.
- Click Save, to save the data.
- Click Submit, to submit the task for processing.

Eyeball screen
The eyeball screen appears in the left side of the split screen with header data from the original document displayed in fields at the top and the line items displayed in rows and columns format at the bottom.
The fields populated with the extraction data appear with thin borders and turn blue when you click in the field to edit.
The fields auto populated with the enrichment data appear with thick borders.
The eyeball offers autorotation functionality to support for invoices that are not stand in correct orientation. It is auto rotating the page based on the angle that docIntel identified. The polygons also auto rotate with the page rotation.
With the polygon functionality, you can select the data from the document to populate a field in the eyeball screen.
Fields, with a Red vertical bar, have been configured for confidence percentage in the eyeballing-decision.yaml file.

You can view the eyeball in full screen using the full screen icon. You can expand and shrink the screen size with the zoom in (+) and zoom out (-) icons.

If a document has more than one pages, then you can move to any page by mentioning the page number in the Page number field. You can also view the eyeball screen in fullscreen by clicking the Fullscreen icon. You can change the split view of the eyeball screen and document in vertical or horizontal using the screen alignment icon.
You can use the tab key to jump between the fields in the eyeball screen. You can also filter the data in the fields.
Eyeball configuration
You can configure eyeball properties with a yaml config file to be defined in the ConfigSet.
For details, see this article.
