V1.0
Overview
Using AI, we aim to provide users with clear visibility into high-priority invoices demanding immediate action. This approach enhances workflow efficiency and facilitates timely payments to vendors.
With the power of AI, the system thoroughly reviews all work items in users' buckets, transcribe key invoice information and provide actionable recommendations.
How does system work?
- System gathers all invoices associated with the processor that require action from the processor user.
- Applies predefined rules considering factors such as "payment due date," "critical vendor," and "invoice amounts" to screen invoices from the compiled list.
- Proceeds to send the filtered invoices individually to AI, accompanied by key information and historical comments, include a few sample invoices with priority orders ranging from 1 to 5 for AI to use as reference.
- Receive the prioritized feedback from AI, which categorizes invoices on a 1-5 priority scale based on intent analysis, sentiment evaluation from associated comments, and critical information.
- Compile the top priority invoices into a designated queue and provide a summary of the prioritized invoices.
- Present the prioritized queue and summary to the processor user for their action.
How will it look like on Processor Portal to the users?
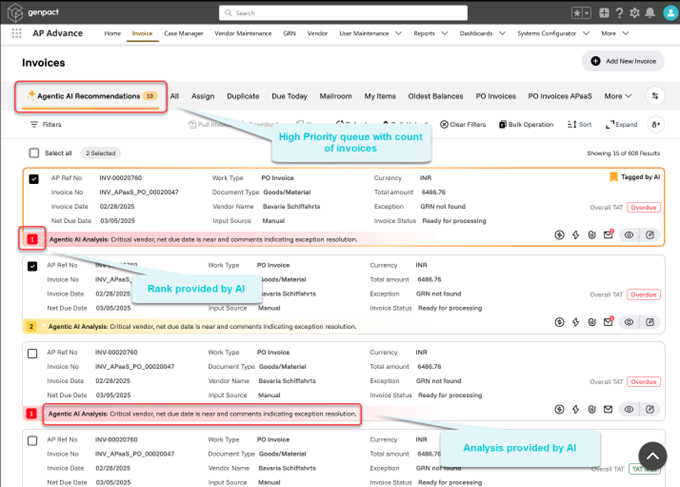
- Users have visibility into a separate queue for shortlisted high-priority invoices by AI, positioned at the forefront of the invoice list view.

NOTE
Functionalities like filter and sorting on Invoice will work as it is on the Priority Queue as well.
If the priority queue is sorted based on criteria such as Amount, and we subsequently need to sort it by Rank, use the existing Refresh button to reorder the priority queue according to Rank.
- Clicking on edit/view for any invoice opens the invoice as shown below:
- A summary will accompany this separate queue, detailing why invoices within it are deemed most critical by AI.
- The rationale behind the prioritization of invoices is provided, aiding users in understanding the urgency assigned by the AI system.
- On edit & view page, AI banner & ranking is also visible based on condition that we have for the queue.
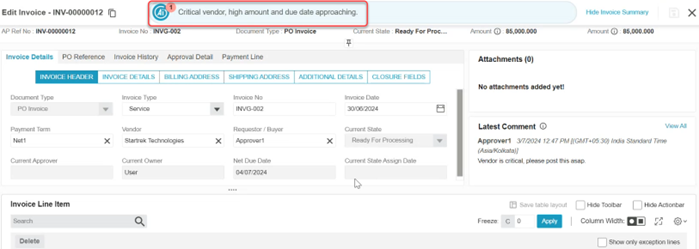

NOTE
If an invoice which has AI provided Priority Ranking and Analysis, is opened from different queue (other than the High Priority Invoice Queue), the Ranking and the Analysis will be displayed on Edit/View screens as shown in the above diagrams. However, the rank and analysis will not be displayed on the List View.
- Feedback section will be available in the configured section (for example: Closure Fields) for all queues along with AI if it is configured from Admin. However, the Feedback section is not prefilled and is optional for users.
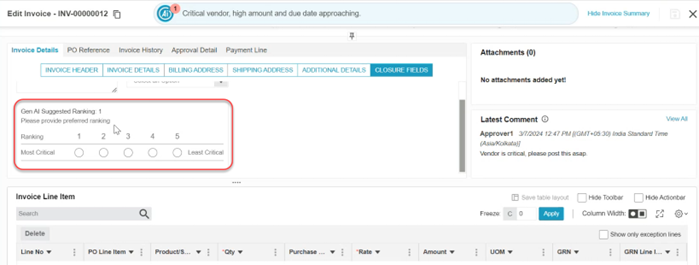

NOTE
This feedback serves as valuable training data for Generative AI models, aiming to improve their performance. The feedback section is configurable; we can set it up on the edit screen to display the ranking provided by AI and to collect input from the user.
Steps to configure
- To enable generative AI services for a customer, configure the subscription or trial status and the allotted tokens with a unique client identifier in Azure Proxy Services. The same client identifier must be included in the Named Credential as a custom header using the key "client_token”.
- After all the configurational setup, schedule the batches using Schedule Apex to invoke AI Priority Ranking response on eligible invoices by making Generative AI API callouts.
- High priority invoices recommended by Generative AI are presented to Processor Users with their Priority Ranking and Reasoning.
- Processor User feedback on the expected Priority Ranking is captured while performing actions on the invoices. This feedback can be used to fine tune our Generative AI models for better responses.
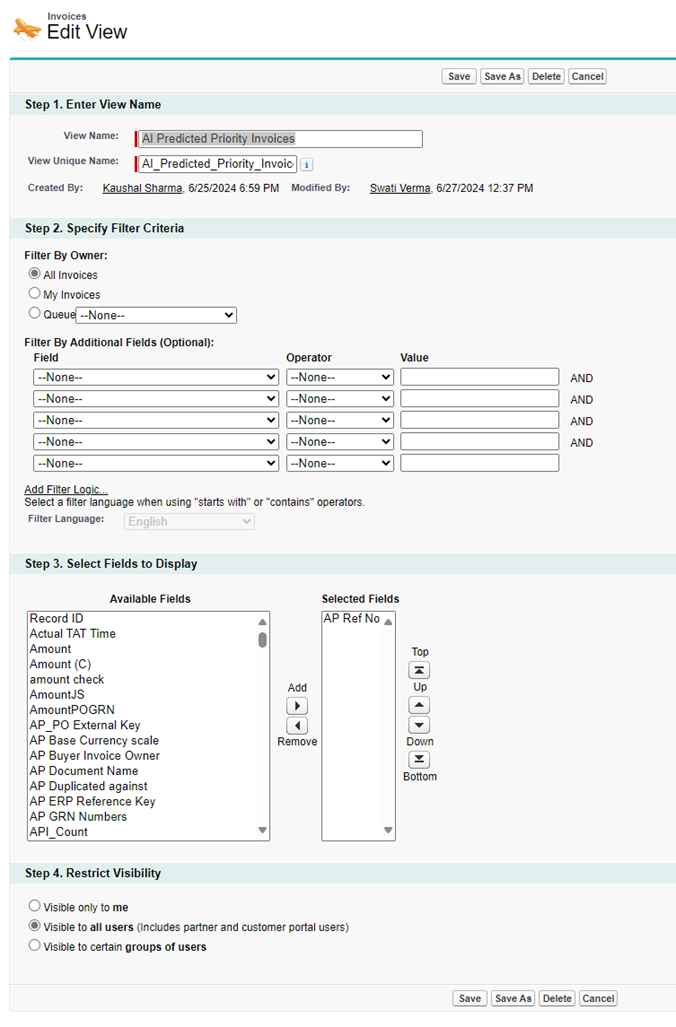
1. Create a List View on the Invoice Object
- Log in to Salesforce account with the necessary permissions to create or modify List Views.
- Navigate to the Invoice Object and click on the App Launcher (grid icon) in the top left corner.
- Search for and select the Invoices object from the list of available objects.
- On the Invoice object page, click on the List View Controls gear icon in the top right corner of the list view section.
- Select New from the dropdown menu to create a new List View.
- Enter a name for your List View.
For example, Outstanding Invoices. Optionally, you can enter a unique name for the API name field. - Choose who can see this List View.
- Click Save to create your List View.

List View filters don't work for the above queue. Filter criteria can be applied using metadata configurations.
2. Setup AI configurations
Create a new record of ‘Gen AI System Configuration’ custom metadata with the name given in the AP_GenAICustomMetadataRecordNameForPP label.
- Log in to the Salesforce as an administrator.
- Go to Setup and type and select Custom Metadata types from the quick find box.
- Click Manage Records for Gen AI System Configuration >> GenAI_System_Config_PP (Name should be in sync with the label AP_GenAICustomMetadataRecordNameForPP)>> Edit.
- Modify AI related configurations.
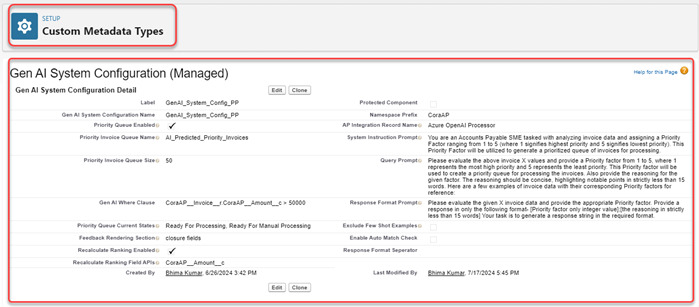
- Priority Queue Enabled: Select to enable the AI Priority Queue.
- Priority Invoice Queue Name: Add the unique name of the invoice list view created for High Priority Invoice Queue.
- Priority Invoice Queue Size: Set the maximum number of invoices to display in the AI Priority Queue.
- Gen AI Where Clause: Where clause to add filter on the AI Priority Queue. Add SOQL where clause to filter out invoices to display in the High Priority Invoice Queue.
Write the Where clause for invoice filter criteria as a child parent query.
For example, for Document Type = PO Type filter, add where clause as:{Invoice__r.Document_Type__c = ‘PO Invoice’} Add namespace if available {CoraAP__Invoice__r.CoraAP__Document_Type__c = ‘PO Invoice’} - Feedback Rendering Section: Use this field to store the section name where feedback should be displayed.
- Priority Queue Current States: Use this field to add the current states as ‘,’ separated values for which the Invoices need to be displayed in the High Priority Invoice Queue. If valid ‘Gen AI Where Clause’ is not available, then system picks this field to filter invoices.
- AP Integration Record Name: Use this field to add name (API_Name__c) of the AP Integration record to use for AI Integration configurations.
- Recalculate Ranking Enabled: Use this field to enable or disable recalculation of Priority Ranking on the Invoice. The criteria for recalculations can be configured in ‘Recalculate Ranking Field APIs’ field.
- Recalculate Ranking Field APIs: Use this field to add the Invoice field APIs as ‘,’ separated which are used for recalculation of the Priority Ranking. The change in these field values while the invoice is still eligible for the AI response, will invoke recalculation, which will be evaluated in the next batch processing.
- Exclude Few Shot Examples: Use this field to exclude the Invoice Few Shot Examples from AI request which are used as Priority Ranking reference.
- System Instruction Prompt: Use this field to add System Instruction prompt to give directives to AI model. Changes in this field are recommended for periodically prompt improvement purposes only.
- Query Prompt: Use this field to add Query Instruction prompt to give directives to AI model. Changes in this field are recommended for periodically prompt improvement purposes only.
- Response Format Prompt: Use this field to add Response Format prompt to give directives to AI model. Changes in this field are recommended for periodically prompt improvement purposes only.

3. Create a Named Credentials
Create a Named Credentials to integrate with generative AI API callouts.
For details on creating Named credentials, see this document.
To use Endpoint URLs directly instead of creating Named Credentials, create a remote site setting for the given URL.
4. AI Integration Setup
As an Administrator, set up one-time configurations (defined in Setup Configuration section) for batch processing of the invoices such as invoice filter criteria’s, invoice current states for which Generative AI priority ranking responses are essential, and invoice field APIs that need to be included for the prioritization.
The existing AP Integration tab is used for configurational setup of Genpact AP Advance integration with Azure OpenAI. Enable AP Integration Tab in the org if it is not enabled already. Below are the list of required configurations and how they are provided using AP Integration Page.
- Integration name:
- AP Integration Tab UI Field: Integration Name
- Use this field to add the name of the AP Integration record.
- This field value should be used in Setup > Custom Metadata > Gen AI System Configuration > Manage Records > Edit record > AP Integration Record Name field value to get integration configurations.
- Enable Generative AI callout:
- AP Integration Tab UI Field: Active/Inactive toggle
- Use this field to enable or disable Genpact AP Advance - Generative integration.
- Named credentials name:
- AP Integration Tab UI Field: End Point
- Use this field to add the name of the Named Credentials used to integrate with Generative AI Services.
- End point URL:
- AP Integration Tab UI Field: Token End Point
- Use this field to add the Endpoint URL to connect with Generative AI-Genpact AP Advance Azure Proxy services. Use this field if the named credentials are not created.
- Client token:
- AP Integration Tab UI Field: Static Header Param (# Separator)
- Use this field to add the unique client identifier for the customer. The same identifier will be configured in Azure Proxy Service along with trial/subscription status and respective tokens. Use this field when named credentials are not created.
- Batch Start Current States:
- AP Integration Tab UI Field: Batch State (ML Scenario)
- Use this field to add the current states of the invoice as ‘,’ separated values for which Generative AI prioritization response is required.
- Invoice field APIs to include:
- AP Integration Tab UI Field: Code Prediction
- Use this field to provide the invoice critical/key fields that are required to determine priority. Add field APIs with namespace in the below format.
{
   "System_Default": "Field_API_1, Field_API_2, Field_API_3"
 }
- Batch size:
- AP Integration Tab UI Field: Batch Size
- Add size of the batch chunks in which invoice records get processed to invoke generative AI response. Make sure the batch size doesn't exceed callout limits of Generative AI model.
- Invoice filter criteria to invoke AI Response:
- AP Integration Tab UI Field: Entity/Object Configuration
- Use this field to filter the invoices for which Generative AI response will be invoked. Use the Entity JSON in the following manner.
- Choose object – Select Invoice object from the picklist.
- Field – Chose Invoice field from the invoice.
- Entity name – Add the invoice field condition operator as string literal.
- Entity value – Add the invoice field value.
| Operator | String Literal |
|---|---|
| = | equal to |
| != | not equal to |
| > | greater than |
| < | less than |
| >= | greater than or equal to |
| <= | less than or equal to |
NOTE
Custom Metadata ‘AP Gen AI System Configuration’ record for Processor Portal will be created as part of the salesforce package by the name given in the Label ‘AP_GenAICustomMetadataRecordNameForPP’, which can be modified as per the requirements.
A record of AP Integration will be created using post install script by the name provided in the custom metadata record field. By editing the given record, above configuration can be done.
Once the configuration setup is complete, schedule the batch class ‘APGenerativeAIBatch’ periodically as per the business requirements. The batch class will generate priority rankings using Generative AI for the eligible invoices.


Setup Invoice Few Shot examples
Business Subject Matter Experts (SMEs) need to create an excel for Invoice Few Shot examples. This document contains Sample data of key invoice fields, which are configured in the Setup Configuration, with the expected Priority Ranking from 1 to 5 (where 1 signifies highest priority and 5 signifies lowest priority). Considerations for creating these examples are defined in the Invoice Few Shot Examples section.
Invoice Few Shot Examples excel will be inserted in the system using Integration Daemon which will store data as records of Invoice Reference Data object.
Invoice few shot examples are Sample Invoice records with key/critical fields data with their expected Priority Ranking provided by Subject Matter Experts (SMEs). These examples will work as a reference basis for Generative AI.
These examples should be created in CSV/Excel format which will be inserted in the system as Invoice Reference Data records using Integration Daemon.
Considerations while creating Invoice Few Shot Examples:
These records consist of critical/key fields of invoices, serving as the basis for Generative AI to determine Priority Ranking.
NOTE
The key fields are same as configured in the setup configuration in Code Prediction (Invoice Field APIs to Include).
Based on the records data, Priority Ranking (from 1 to 5, where 1 signifies the topmost priority and 5 represents the least priority) should be provided by SMEs.
Include realistic but diverse examples – Create invoice records that reflect realistic scenarios but also vary in complexity, size, and characteristics.
Ensure a balanced distribution of attributes/fields values across the sample records to prevent bias and provide a fair representation of different Invoice scenarios.
Invoice Few Shot Example
| InvoiceIdentifierField | KeyField1 | KeyField2 | KeyField3 | Priority Ranking |
|---|---|---|---|---|
| Invoice1 |
|
|
|
1 |
| Invoice2 |
|
|
|
3 |
| Invoice3 |
|
|
|
2 |
| Invoice4 |
|
|
|
5 |
| Invoice5 |
|
|
|
1 |
| Invoice6 |
|
|
|
4 |
| Invoice7 |
|
|
|
3 |
See a sample format here.
- The example CSV should not contain more than 1500 words.
- The sheet will work for both Buyer and Processor portal.
